


Many photographers today want to know how to take macro pictures, thanks to a growing number of beautiful images online of small plants, animals, and insects. Macro photography is not always easy, especially for beginners, but it is one of the most rewarding genres of photography you can do. With the right skills, you will be able to capture amazing images even in your own backyard. To learn macro photography from start to finish, you should begin by reading the tips and techniques in this guide, taught by an award-winning macro photographer exhibited at the Smithsonian Museum of Natural History. By the end, you will know exactly how to put these recommendations into practice and capture stunning macro photographs for yourself.

Macro photo exhibited in the Smithsonian Museum of Natural History from 2015 to 2016, “Nature’s Best Photography” award winner. © Spencer Cox
NIKON D800E + 105mm f/2.8 @ 105mm, ISO 100, 1/640, f/3.2
Before anything else, if you’re more of a visual learner, you may want to watch the following video we created to introduce macro photography. It covers many of the same topics as this article, although some sections have been shortened for the sake of video length:
ardare il video su www.youtube.com</a> oppure attiva JavaScript se è disabilitato nel browser.</div></div>
What Is Macro Photography?
Macro photography is close-up photography of small subjects, including things like bugs and flowers. You can take macro pictures in a studio or outdoor environment so long as you are magnifying your subject sufficiently.
Officially, you may hear that macro photography only happens when you take pictures of small subjects with a magnification of “life size” or greater. I will cover more about the meaning of magnification and life-size in a moment, but essentially it means that you must take pictures where your subject is the same size as your camera sensor or smaller, and it fills the frame. (So, if your camera sensor is one inch wide, you would be photographing something 1 inch or smaller.)
That is a very strict definition, and frequently you will hear photographers call an image “macro” even when it shows a slightly larger subject. The same is true of the photos in this article, many of which do not fit this technical definition, but they are close-up photographs nevertheless.

Introducing Macro Photography for Beginners
How do you take macro photos? Here are the most important steps:
- Understand macro photography terminology.
- Pick the right camera and lens equipment.
- Get enough depth of field.
- Pick camera and flash settings for a well-lit photo.
- Focus on the most important part of your subject.
- Learn the common behaviors of various insects.
- Compose and take your picture.
Some of these are harder to do than you might think, such as getting enough depth of field and focusing on the most important part of your subject. However, the tips in the rest of this macro photography tutorial will give you a good idea of where to begin, and you should be able to master everything with a bit of practice.

What Is Magnification?
In macro photography, it is important to know how large or small your subject appears on your camera sensor. Comparing this number versus your subject’s size in the real world gives you a value known as your magnification.
If that ratio is simply one-to-one, your subject is said to be at “life size” magnification. For example, if you’re photographing something that is one centimeter in length, and it is projected exactly one centimeter onto your camera sensor, it is at life size (regardless of the size of your camera sensor).
Typical sensors in DSLRs and mirrorless cameras range from about about 17 millimeters to 36 millimeters across. So, a 1 cm subject is pretty big by comparison, taking up a significant portion of your photo. If you end up making a large print, that tiny object will appear huge – potentially billboard sized!
To make things easier to understand and compare, macro photographers use an actual ratio rather than always saying “life size” or “half life size.” Specifically, life size is 1:1 magnification. Half life size is 1:2 magnification. Once you get to about one-tenth of life size, you arguably are not doing close-up or macro photography any more.
Good macro lenses let you shoot at 1:1 magnification, and some specialized options do even more than that. (Canon has a macro photography lens that goes all the way to 5:1, or 5x magnification, which is insane!) However, other lenses on the market called “macro” may only go to 1:2 magnification or even less. Personally, my recommendation is to get a lens that can go to at least 1:2 magnification, and ideally 1:1 magnification, if you want as much flexibility as possible.

What Is Working Distance?
Working distance is easy: It’s the distance between the front of your lens and your nearest subject. If your working distance is too small, you might end up scaring your subject or blocking the light simply because you are too close. Ideally, you will want a working distance of six inches (15 centimeters), with the best case scenario being twice that or more.
The working distance of a lens is smallest at 1:1 magnification, since you obviously must be as close as possible to your subject to capture such extreme photos. Also, lenses with a longer focal length have more working distance than lenses with a more moderate focal length. For example, the Nikon 200mm f/4 and the Canon 180mm f/3.5 are two examples of macro photography lenses with large working distances. By comparison, the Nikon 60mm f/2.8 macro lens has much less working distance.
It is always best to look for a lens with the largest possible working distance so that you are less likely to scare your subject or cast a shadow on it. However, macro lenses with a longer focal length like 180mm or 200mm are generally more expensive. If you want to balance price and working distance, consider a lens in the range of 100mm to 150mm. Personally, I use a 105mm macro lens.

Best Cameras for Macro Photography: DSLR vs Mirrorless
For macro photography, both DSLRs and mirrorless cameras can work very well. The key is to pick a camera that lets you use a good macro lens, and ideally one which has as little lag as possible between seeing your subject, pressing the shutter button, and having the image recorded. Traditionally, these both were areas where DSLRs held an advantage, due to lagging electronic viewfinders and fewer native macro lenses on mirrorless cameras. Today, those differences are generally negligible, and sometimes lean in favor of mirrorless.
Mirrorless cameras also frequently have other benefits that you might find useful, such as focus peaking (an overlay that shows which parts of your subject are in focus – helpful for manual focus macro photography). Also, the ability to review your photos without taking your eye from the viewfinder is valuable if you want to judge things like sharpness and flash exposure quickly.
The only thing I would caution is that, if you do pick a mirrorless camera, you should get one with an electronic viewfinder. Trying to compose and hold a macro photo steady with a rear LCD screen, especially at extreme magnifications like 1:1, is a nightmare. Since mirrorless cameras with electronic viewfinders frequently cost more than a competing DSLR, you might want to pick up a DSLR (potentially a used one) if you are on a budget. But all of this is very picky. Regardless of the camera, you will be able to get some excellent photos – and you will never find a camera that guarantees a perfect keeper rate for such difficult subjects!

Best Cameras for Macro: Full-Frame vs Crop-Sensor
If your goal is to create photos with the highest magnification possible, full-frame cameras are usually overkill for macro photography. Even the Nikon D850 with 46 megapixels cannot match the potential macro detail of the 20 megapixel Nikon D7500, simply because the D7500 has a slightly higher pixel density.
With macro photography, the highest pixel density (most pixels per square millimeter of the sensor) is what determines the maximum detail you can get on your subject. The D850’s large sensor has fewer pixels per millimeter than the crop-sensor D7500, despite having more total pixels. In many genres of photography, larger pixels – and more total pixels – are preferable. With 1:1 macro photography, though, it’s all about pixel density. The reason? When you crop a D850 photo to match images from the D7500, you lose enough pixels that the D7500 wins (though not by much).
Still, full frame cameras are great for macro photography. You shouldn’t think otherwise. If you take photos that aren’t at maximum magnification, they still have all their usual benefits over smaller sensors. So, a full-frame (FX) camera is still generally better for macro photos than a crop-sensor (DX or aps-c) camera, but by a smaller amount than in other types of photography.

Best DSLR for Macro: Canon vs Nikon
For almost all genres of photography, Canon and Nikon (and Sony, and others) are so close in quality that arguments about which is “better” are, at best, extremely picky. Sure, there are differences, but it is rare that any system has a flaw that is fatal for the typical user.
As far as macro photography, this is still true, but you do need to keep some extra considerations in mind. Canon cameras in particular do not calculate aperture in the same way that cameras from other brands do. Specifically, when you shoot at high magnifications like 1:1, the Canon cameras will read your aperture value incorrectly. It might say f/11, when everything about the photo (diffraction, depth of field, and exposure included) acts as if you’re shooting at f/22.
That is because aperture, on any lens, starts to do unexpected things at such high magnifications. In short, when your aperture is physically one size, it acts like another. Nikon, Sony, and other manufacturers all tell you the “functionally correct” aperture (f/22 in this case), while Canon does not. So, you need to keep that in mind when you shoot Canon cameras. This is far from an impossible drawback to overcome, but it is important to know about. The more frequently you change magnifications, the more of a problem this is.

NIKON D7000 + 105mm f/2.8 @ 105mm, ISO 800, 1/250, f/14.0
Depth of Field for Close-Up Photos
For non-macro photography, your subject won’t be especially close to your camera – maybe 5 or 6 meters, or even as far away as the horizon. At these distances, a normal aperture of f/8 or f/11 typically will render a sharp scene from front to back (aside from extreme telephoto shots, since telephotos have less depth of field).
Macro photography is different. When you take close-up photos, you naturally end up with very little depth of field, even at small aperture values. At 1:1 magnification, your depth of field may be so thin that you can’t get a fly’s head and feet both to appear sharp at the same time, even though they are just millimeters apart!

The thin depth of field is related to another challenge of macro photography: You don’t have much light. Why not? There are four main reasons why you’ll have to work with very little light in macro photography:
- Your camera itself usually blocks some natural light.
- Your flash might not point at the right angle to illuminate your subject.
- Apertures like f/11, f/16, or smaller are necessary in order to get enough depth of field, but they reduce light.
- You’ll need to be at very fast shutter speeds in order to reduce blur from camera motion (which is magnified for close-up photography), also darkening the image.
With all these issues together, your close-up photos can look like you’ve left on your lens cap in the middle of the day. So, how do you balance depth of field with capturing enough light? There are a few ways, each with their own compromises.
Method 1: Open Up Your Aperture
You may choose to live with a thin depth of field for your macro photography – to the point where you won’t be able to get an entire ant head to appear sharp at the same time. If that seems fine to you, just open your lens’s aperture as wide as possible (or only slightly stopped down – something from f/2.8 to f/5.6), and you’re set to take macro photos.
The benefit of this approach is that you don’t have to worry about complex lighting setups or software fixes to make your macro photos look good, since you’ll generally capture enough light to make things work. The downside is that it becomes nearly impossible to focus your lens handheld at the closest magnifications, since there is essentially no depth of field.
For that reason, this method works best if you are trying to take photos of subjects that are a bit larger, in the range of 1:4 to 1:10 magnification. However, I do not recommend it if you want to take life-size photos at 1:1 magnification.

Method 2: Stop Down and Use a Flash
The next method (and the one I use the most) is to stop down the aperture to a small value. By small, I mean f/16 or f/22. The upside to using such a small aperture is that it is easier to get your subject to appear in focus – though still tough – and your depth of field becomes manageable.
However, a flash is essentially mandatory with this method, since you are losing a huge amount of light. On top of that, diffraction starts to have a noticeable impact on the sharpness of your photos. Still, it is important to keep in mind that an f/22 image with diffraction looks far sharper than an f/4 picture without any depth of field.

Method 3: Stack a Set of Macro Photos
Another method is focus stacking. It involves taking your photos at more “moderate” apertures, with lower diffraction but a shallow depth of field (usually f/8 or f/11).
To counteract this tiny depth of field, you take several photos at different focus distances and combine the best parts of each in post-processing. For example, you may take one photo where a bug’s head is in focus, one where the wings are in focus, and a third where the back legs are in focus. Then, you can merge them into a sharp bug photo from front to back.
There are two upsides to this method: First, image quality is extremely high, since diffraction is a non-issue. Second, you have the ability to extend your depth of field artificially so that any subject can be completely sharp from front to back, even at especially high magnifications.
The downsides are numerous, however. Focus stacking is typically confined to studio and tripod work because precision focus is required. Another downside is the time involved. For maximum quality, you may need to combine dozens of photos into a single picture, which can take hours of photography and post-processing. You also need specific software to combine focus-stacked images (such as Photoshop or Helicon Focus), with better and more specialized options generally costing more.
The biggest issue, though, is that your subjects need to be completely still. It is possible to find bugs that aren’t moving, but it isn’t always easy. This method works best for plants, or bugs that are drowsy and waiting for the sun to come out (try the early morning).
This is also a fairly costly option, because you will need a decent amount of dedicated equipment. A solid tripod, a tripod head, a macro focusing rail, and special software are all requirements for the most dedicated focus stackers.

Method 4: Tilt Your Plane of Focus
The final way to increase depth of field is to buy a special type of macro photography lens: a tilt-shift. These lenses let you tilt the depth of field along your subject. For example, you may be able to focus simultaneously on a bug’s head and wings, even though both are different distances from the lens. Potentially, you can get an entire bug to be sharp in a single photo at much more reasonable apertures than normal.
There are many downsides here, though. First, tilt-shift macro lenses cost at least $1000 used and up to $1800 new. They generally don’t focus to 1:1 macro (about 1:2 instead), they only focus manually, and they are difficult to use without a tripod. Lenses like this mainly shine for studio work of non-moving subjects, in which case focus stacking may be the preferable option. That is not to say this method is always a bad one, but that it is very specialized, and most photographers will not find tilt-shift lenses to be the best option overall.
Which Method Is Best to Capture Enough Depth of Field?
Most macro photographers use a combination of the above methods depending upon the situation. Personally, I tend prefer to use a flash and a small aperture for high magnification macro photography. If I am taking pictures of larger subjects like dragonflies and lizards, I will use a wider aperture and shoot in natural light. With practice, though, the key is to realize for yourself which scenarios demand each of these methods, making it easier to set your camera appropriately.
Focusing Tips for Macro Photography
In high-magnification macro photography, the amount of your subject that is in focus won’t be more than a couple of millimeters, even at a crazy aperture like f/32. It can be tough to place the focus accurately on a bug, considering that your pulse alone probably makes your hands jump more than a couple millimeters. You will want to take your photos between breaths and heartbeats – seriously – or you may find it impossible to get anything in focus.
 NIKON D7000 + 105mm f/2.8 @ 105mm, ISO 800, 1/320, f/3.2
At this distance, too, the autofocus system in even the newest DSLRs and mirrorless cameras cannot keep up with your hand movements. If you attempt to autofocus at high magnifications, especially something like 1:1, it will be an exercise in frustration. Unless you are using a tripod, it could be impossible for your camera’s focusing system to lock onto a subject.
All is not lost, though. It is still possible to get sharp macro photos at 1:1 magnification, even handheld. I will cover all those techniques below. Note, though, that you do not need to use any of the following information if you are working on a tripod. Instead, you can use autofocus or live-view manual focus without any issues.
 NIKON D7000 + 105mm f/2.8 @ 105mm, ISO 800, 1/250, f/22.0
The Easiest Technique: Manual Focus
You will almost certainly need to focus manually at 1:1 macro distances, since the autofocus system in any camera cannot work fast enough to counteract your hand movements. However, this may not mean what you think it does.
Some photographers attempt to use manual focus incorrectly for macro photography; they hold the camera as steadily as possible and turn the focus ring left or right to focus, taking the photo when the viewfinder image looks sharp. That simply doesn’t work! This might work fine to focus manually for non-macro photos, but it is not feasible for handheld macro photography. Your hand movements from focusing will make the frame even shakier, and it will become impossible to change focus quickly.
Instead, the best method is to keep your macro photography lens fixed at a certain magnification. Then, slowly rock the camera forward and backward – sometimes on a stick or monopod – millimeters at a time, while looking through the viewfinder. When the viewfinder image is sharp, take the photo.
Although this method is not perfect, it gives me about a 40% keeper rate for 1:1 photos of fly-sized bugs. This may seem low, but it is very difficult to do better without a tripod. With practice, you should be able to improve your keeper rate even further, but even a small ratio of sharp macro photos at the highest magnification is quite an accomplishment.

Focusing Technique at Wider Magnifications
If you aren’t trying to magnify your subject as much as possible, autofocus is generally more accurate for macro photography. If your subject is about ten centimeters (4-5 inches) long, manual focus no longer has any major benefits. I recommend AF-C focusing mode (also known as Continuous or AI-Servo), because your hands still move enough that you’ll want your camera to be adjusting constantly for the best focus at these magnifications.
Aligning Your Macro Subject with Your Depth of Field
As I have mentioned throughout this tutorial, depth of field is very small for macro photography, regardless of your aperture. One way to make the most of a challenging situation is to align your subject parallel to your depth of field as much as possible. In the photo below (not a 1:1 macro, but the point stands), the damselfly is almost entirely sharp, despite the shallow depth of field.
 NIKON D7000 + 105mm f/2.8 @ 105mm, ISO 1250, 1/100, f/3.5
In other photos, you will need to choose which part of the bug “deserves” to be in focus. Generally, this will tend to be the bug’s eyes, since they are the most important parts of an image. However, for certain subjects, you might care more about the wing pattern, such as ladybugs and butterflies. Either way, focusing is a crucial part of macro photography. You can also check out our longer tutorial on the subject if you want to learn more.
Step-by-Step Method of Taking Macro Photographs
One of the best ways to get good at macro photography, or any genre of photography, is to know the exact steps that you need to accomplish, even before you take a picture. In macro photography, a possible set of steps looks like this, if you are trying to take high magnification close-up pictures with a flash as your main source of light:
- Buy a monopod or find a stick.
- Get a strong flash, and use a diffuser to soften the light. If you don’t have a diffuser, the best solution is often to make one yourself. Experiment with cardboard, tin foil, tape, and paper towels (no joke). Also, check out our comprehensive tutorial on macro photography lighting.
- Put a macro lens on your camera and set it to manual focus at your intended magnification.
- Pick the correct exposure settings so that you capture the enough light. If the flash is your main source of light, and you’re shooting at 1:1 magnification, it is a good idea to use the fastest shutter speed that still syncs with your flash (typically 1/200 or 1/250 second). Use an aperture from f/16 to f/22.
- Set your ISO to whatever value gives an accurate exposure of a leaf when the flash fires in manual mode at roughly 1/4 power. That sounds extremely arbitrary, and it is, but it works well. The simple reason? You’ll want the brightest possible flash to help gather light, but if your flash is much brighter than 1/4 power, it typically will take too long to recharge between exposures. Hence, pick an ISO that results in a flash of 1/4 power most of the time.
- Switch the flash to TTL (automatic) mode. However, even though it’s in automatic mode, you know it will tend to hover around 1/4 power, thanks to step 5!
- To get an accurate exposure, you will need to adjust your flash exposure compensation, potentially by as much as a few stops. It is not uncommon to have flash compensation in macro photography that is something like +2 or even +3.
- At this point, the only “automatic” setting you’re using is auto flash, which will adjust itself depending upon the reflectiveness of your subject. All your other settings – aperture, shutter speed, and ISO – will stay constant. Don’t worry about changing them.
- Put your camera on a monopod or a stick, assuming that it doesn’t interfere with reaching your subject at the right height.
- Find a bug that lands long enough for you to photograph it – hopefully, one that is the size of a housefly or larger.
- Focus (using the manual focus technique covered earlier in this tutorial), and take the picture!
- Watch out for dust spots in the editing stage, and you’re done.
Macro Photography Composition Tips
Even in macro photography, the basics of a pleasing composition remain the same. It is still important to balance the compositional weight of your frame, for example, and you have to exclude extraneous details from your image just as you always do. However, being macro photography, there are some aspects of composition which stand out more than they otherwise would.
 NIKON D7000 + 105mm f/2.8 @ 105mm, ISO 800, 1/250, f/8.0
Pay Attention to the Out-of-Focus Background
One of the main tips for composition in macro photography is to be aware of the background. Since the background will be far out of focus, it is important to make it look as good as possible and complement your subject. From a low angle, for example, you could get an out-of-focus blue sky in your photo. From a different perspective, your background could turn the color of autumn leaves. Green grass works well with many subjects, too. You can even set up your own background by asking a friend to stand behind your subject while wearing a bright shirt. Be creative!
The photo below grabs attention because the color contrast of the bright orange dragonfly is strong against the green background. Look for contrast like this, and you will have a much better chance of getting stand-out shots.
 NIKON D7000 + 105mm f/2.8 @ 105mm, ISO 280, 1/400, f/4.0
Also, something interesting can happen with the background in macro photography as you focus closer to your subject. If you use a flash to illuminate a scene at 1:1 or 1:2 magnification, you may find that the background of the image turns dark, if not completely black.
This happens because of a property of light. As your distance from a light source doubles, the amount of light you receive cuts in four. When your flash (or diffuser) is extremely close to your subject, which is true in macro photography almost by definition, the distant background receives comparatively no light at all. A flash is much brighter than daylight, and even the sun at noon may not be strong enough to brighten the background to any noticeable degree. The result is a very studio-style look, even outdoors, like in the photo below (taken on a sunny day in my yard, but with a flash as the only signficant source of light):
 NIKON D7000 + 105mm f/2.8 @ 105mm, ISO 1250, 1/250, f/22.0
On top of all that, it is important to know how certain colors can work to balance each other out, in terms of composition. Reds and oranges stand out and draw the eye’s attention, whereas cooler colors (green, blue, and purple) naturally fade into the background.
Use Angles to Your Advantage
Another tip to remember for macro photography is that the angle of the camera can throw things in and out of focus. According to basic geometry, any three points in space can be connected by one plane, no matter where those points are. The value of this law in photography is that at least three elements of a photo, even if they are different distances from the camera at first, can always be brought into the same plane of focus.
For example, if the three objects are the head of a crab and its two front claws, it should be clear why this suggestion is so important. All you need to do is move around the camera until those objects are within the same plane of focus, and you can capture a photo like the one below, where everything important is sharp:
 NIKON D7000 + 105mm f/2.8 @ 105mm, ISO 800, 1/200, f/14.0
The Importance of Colors in Macro Photography
Lastly, with macro photography, colors are extremely pronounced. Shooting in your camera’s RAW format is always important regardless of your subject, but it is especially crucial to make the most of macro photography’s color detail.
One reason for such vivid colors is that there is very little atmosphere between the lens and the subject when you are shooting close-ups. So, if a lot of haze or fog is in the air, you will get more vivid macro photos than anything else
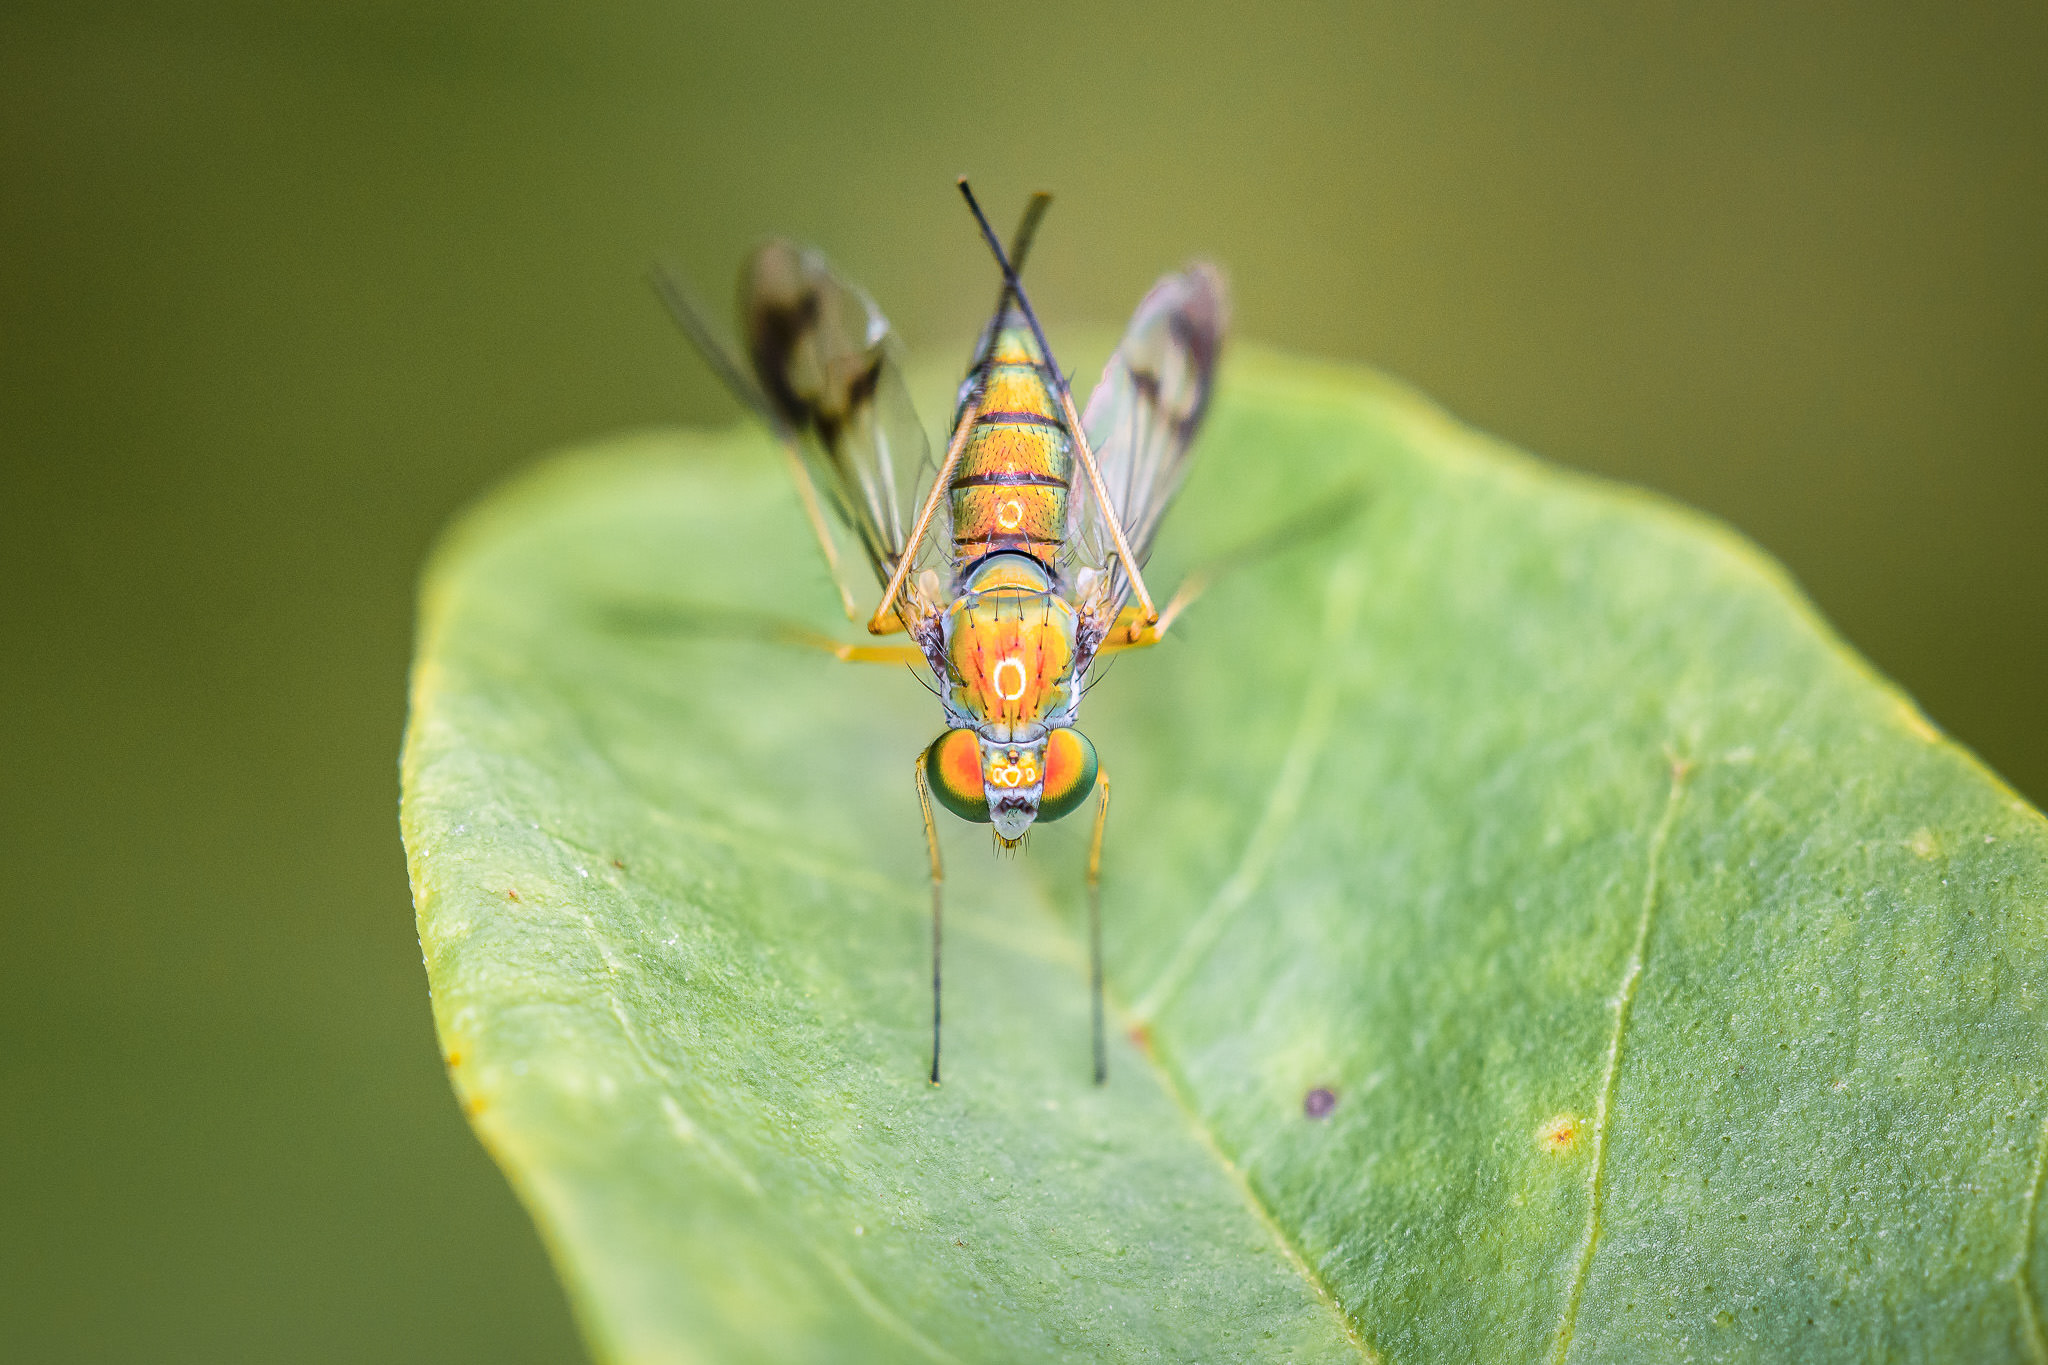
Also, as you focus closer and closer to your subject, you will start to see tiny color details that normally are not visible. For example, did you know that the compound eye on certain fly species is a rainbow of color? We can’t see any of that with the naked eye, but a macro lens at 1:1 magnification definitely does. Colors are one reason why macro photography is so interesting.
 NIKON D800E + 105mm f/2.8 @ 105mm, ISO 1600, 1/320, f/8.0
How to Approach Your Close-Up Subject
Bugs are skittish. Dragonflies, for example, tend to scatter when anything enters their field of view, and smaller bugs just fly whenever they feel like it. Approaching a restless bug is as much luck as it is science. Still, there are some techniques that you can put into practice to improve your chances. These tips will vary depending upon the specific type of bug you photograph.
For dragonflies and damselflies, it is best to move slowly and approach while rocking gently side-to-side. Dragonflies instinctively fly when anything moves directly towards them or directly away from them, sometimes even if that movement is slow. However, sideways motion does not affect the dragonfly much at all. Try taking a small and slow step forward, rocking (slowly) side-to-side for several seconds, then taking another step forward. If you wait ten or fifteen seconds between steps, the dragonfly may forget that you exist. Using this technique has allowed me to get great macro photos incredibly close to a dragonfly.
 NIKON D7000 + 105mm f/2.8 @ 105mm, ISO 100, 1/500, f/4.0
Bees, on the other hand, do not get scared easily. They are always very focused on their task, and they will only leave a flower after they’ve gotten enough pollen. Don’t make wild movements, of course, but you don’t need to be obsessively slow and quiet. The hardest part about photographing bees is they rarely sit still. To get a good bee photo, it is easiest to pre-focus on one point on a flower, then wait for a nearby bee to crawl over that area. It may still take some time, depending upon the willingness of your subject.
 NIKON D7000 + 105mm f/2.8 @ 105mm, ISO 220, 1/500, f/5.6
Flies are a bit more skittish, but still easy enough to photograph. The best part about flies is that they typically do not react to slow movement in any way. They are easy to approach without scaring away. Just be sure to avoid sudden movements, and change your camera settings slowly. The only annoying thing about photographing flies is that they don’t like to stand in any one place for long. So, approach flies quickly, but be slow and deliberate about it. Easy enough?
 NIKON D800E + 105mm f/2.8 @ 105mm, ISO 400, 1/250, f/16.0
With non-flying bugs, you clearly do not need to worry as much about scaring them away. Ladybugs, grasshoppers, and some ants, for example, can fly, but they typically do not. At the very least, they aren’t really scared by photographers (with grasshoppers being the most skittish of the bunch). The issue is that these bugs tend to walk very quickly, making it tough to focus on them.
 NIKON D7000 + 105mm f/2.8 @ 105mm, ISO 800, 1/400, f/3.5
Butterflies are very sensitive if you move in close, but they are easy to stand back and photograph due to their size. If you find a butterfly staying in one place for long enough, you generally have a good opportunity to capture a nice close-up picture.
 NIKON D7000 + 105mm f/2.8 @ 105mm, ISO 280, 1/200, f/4.0
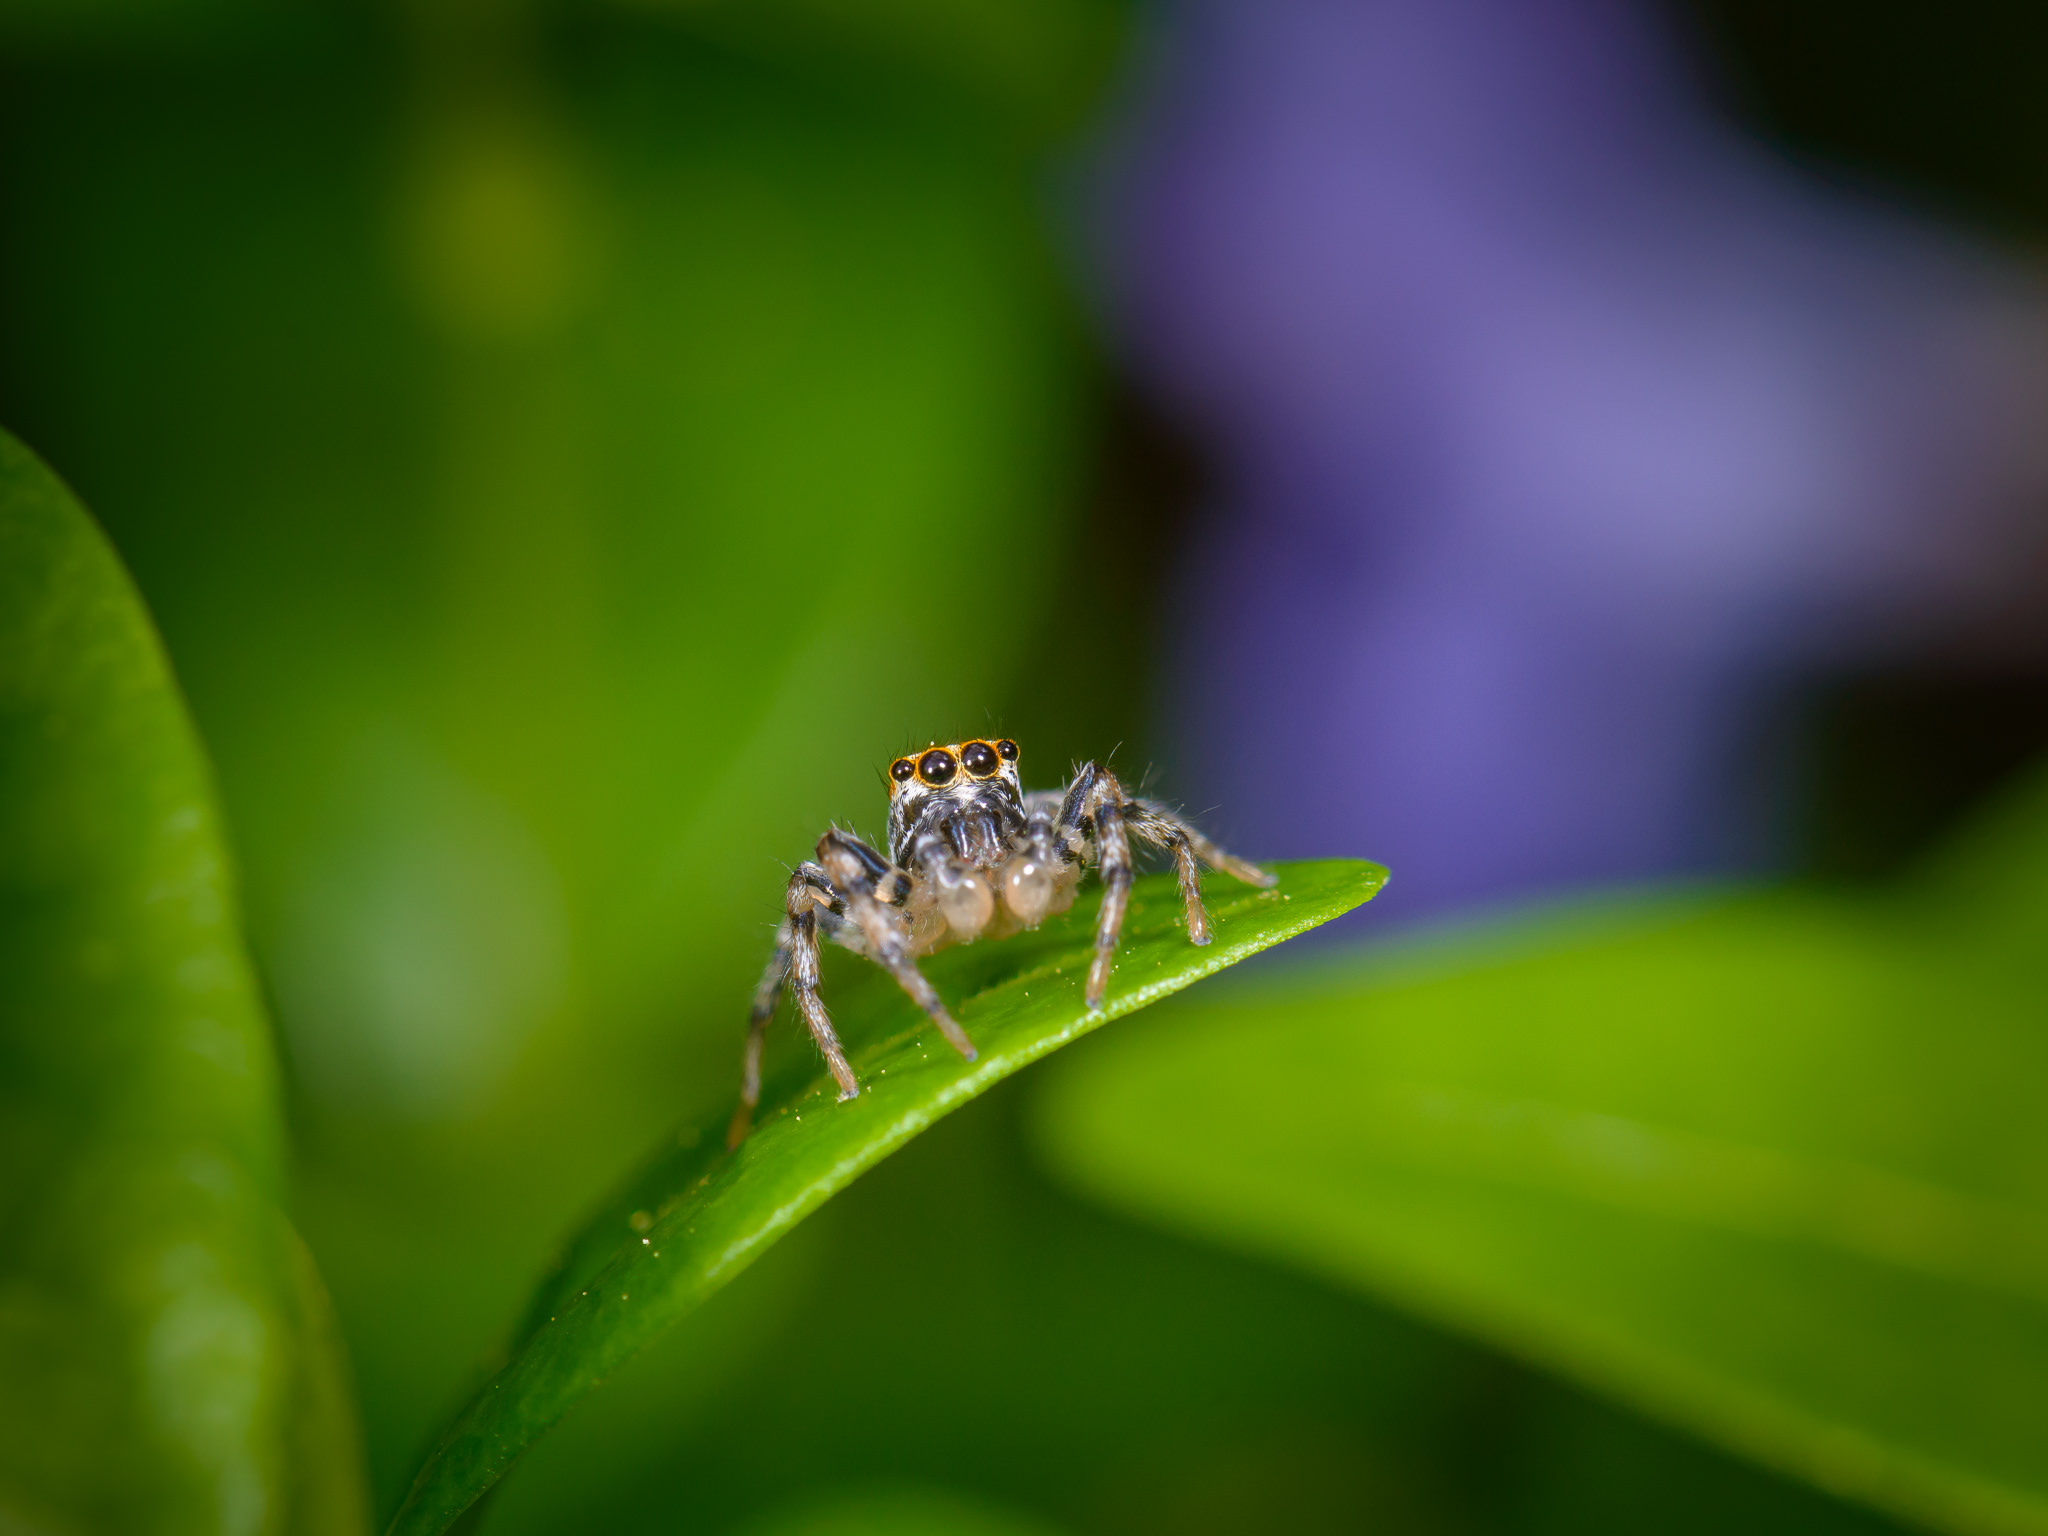
Spiders are a photographer’s best friend. Most of them hardly move at all, and they are large enough to get in focus relatively easily. Spider webs can look great in photos – say, with raindrops backlit by the sun – but some webs are just distracting. Try photographing jumping spiders, since they rarely move, and they look “cuter” up close than most spiders. Not to mention, they are almost completely harmless (they rarely bite, and it’s not even as bad as a mosquito bite if they do).
 NIKON D800E + 105mm f/2.8 @ 105mm, ISO 400, 1/250, f/16.0
For tiny bugs, your best hope is to avoid getting your shadow over them. This is a good tip for approaching most of these creatures, but tiny insects in particular tend to ignore you if you don’t stand between them and the sun. However, the smallest bugs are also the only ones which seem affected by the flash from a camera. Some will jump every time that you fire your flash, and they’re usually faster than your camera shutter delay, so you end up with an empty frame! That’s just another example of how fascinating some of these little creatures are.
A Quick Plea for Ethical Macro Photography
We at Photography Life would like to issue a strong suggestion not to harm your macro subjects. In a surprisingly large number of macro photos today, photographers literally put their subjects into a freezer overnight, then stage photos in an all-too-perfect studio environment (complete with mushrooms, “rain” from water bottles, and perfect pools of water) to get otherworldly images.
The resulting macro photos are annoyingly cliché, dull, and harmful to the reputation of macro photographers as a whole – and to the critters you photograph. Not to mention that such photographers very frequently get called out publicly and end up with a string of negative articles associated with their business. If you are intrigued by the wonderful field of macro photography, and the incredible habits of small bugs and critters, we urge you not to be one of these people.
Summary and Final Macro Photography Tips
Hopefully, this tutorial has set you on the right path to begin taking beautiful macro photos. The technical aspects of macro photography are certainly important, but, as with most genres of photography, the practical considerations of composition and finding subjects are far more relevant to creating great photos – and, with macro photography, the best subjects are perhaps no farther than your backyard. If you can brave some dirt and mosquitoes, you’ll be able to find hidden treasures almost anywhere.
Finally, here are some macro photography tips and ideas to help you get started:
- Look for subjects beyond just bugs and plants. You can take fascinating macro photos in a studio of anything from pencils to droplets of water. I have seen some exceptional macro photographs of silverware against a stark background.
- Stake out ponds and streams. Bugs need to stay hydrated, too, and many of them love being around waterways. If I can’t think of where to go to take good macro pictures, I always head to a nearby source of water.
- Keep the seasons in mind. In winter, there may not be as many bugs to photograph, but you could have an entire world of ice and snowflake photography to capture instead, depending upon where you live.
- Start taking macro pictures early in the day. At sunrise, you will find bugs waiting with droplets of water for the sun to rise. That is how I captured some of my best macro photos.
- Wear long sleeves. As much as I like bugs, I don’t like it when they bite. If you are taking pictures of small creatures, there is a good chance that mosquitos and other biting insects will be nearby. Wear long sleeves, closed shoes, and a head net in bad conditions. Also, consider gloves, even when it is hot, if you are in mosquito territory. I generally recommend that you avoid bug spray, in part because you may scare away the very creatures you are trying to photograph!
- Put effort into lighting. Not all flash photography is equally good. It takes some trial and error to get a good lighting setup that looks natural, and going with your first attempt may result in photos that look fake and unnatural. The image below was lit entirely by my flash, but the light is still very pleasant.
- Have fun with your macro photography! This is one of the most enjoyable genres of photography you can do, but it is easy to get frustrated at first. Again, even under the best possible conditions, my keeper rate for handheld 1:1 macro photos is less than 50%, and I have been doing this for a while. Even two or three sharp images is a huge success, and you will improve very significantly with practice.
